How to Use SideDisplay Without iPhone USB Tethering
SideDisplay turns your Tesla's touchscreen (or any device with a WebRTC-compatible browser) into a wireless extended display for your MacBook. The standard setup uses iPhone USB tethering to provide internet to your Mac while freeing up its Wi-Fi for Internet Sharing — but what if you don't have an iPhone, or you'd rather not use USB tethering?
This guide covers every alternative method to get SideDisplay working without iPhone USB tethering.
Why Does SideDisplay Need iPhone USB Tethering in the First Place?
Before diving into alternatives, it helps to understand the standard setup:
Your MacBook's Wi-Fi needs to be free. SideDisplay uses macOS Internet Sharing to broadcast a Wi-Fi network that your Tesla (or other device) connects to directly. This direct Wi-Fi connection is what enables low-latency WebRTC streaming.
Your Mac still needs internet. Tesla refuses to stay connected to a Wi-Fi network that doesn't have internet access (it uses a captive portal check). So your Mac needs to be online through some means other than Wi-Fi.
iPhone USB tethering solves both problems. It provides internet to your Mac via USB, leaving the Mac's Wi-Fi available for Internet Sharing.
The key takeaway: any wired internet connection to your Mac will work. iPhone USB tethering is just the most portable option.
Why Can't You Just Use Android or a USB Wi-Fi Adapter?
You might wonder: "Why not just plug in an Android phone, or use a USB Wi-Fi dongle to get internet while the built-in Wi-Fi handles Internet Sharing?"
Two macOS limitations make this impossible:
macOS does not support Android USB tethering. Unlike iPhones, which are natively recognized as a network interface when connected via USB, Android devices require third-party drivers that macOS does not provide. You simply cannot share an Android phone's internet to your Mac over USB.
macOS does not support USB Wi-Fi adapters. Apple removed support for third-party USB wireless LAN adapters. You cannot add a second Wi-Fi interface to your Mac via USB — so you can't use one Wi-Fi for internet and another for Internet Sharing.
This is exactly why a travel router is so useful. It takes a wireless internet source (Android hotspot, café Wi-Fi, Starlink, etc.) and converts it into a wired Ethernet connection that macOS fully supports. From your Mac's perspective, the travel router looks just like a regular Ethernet cable plugged into the wall.
Method 1: USB Ethernet Adapter
Best for: Home offices, co-working spaces, or anywhere with an Ethernet port.
What you need:
- A USB-C to Ethernet adapter (any brand works; available from $10–$20)
- An Ethernet cable
- Access to a wired network (router, wall jack, etc.)
Setup:
- Connect the USB-C Ethernet adapter to your MacBook.
- Plug the Ethernet cable from your router or wall jack into the adapter.
- Verify your Mac is online via Ethernet (check System Settings → Network).
- Open System Settings → General → Sharing → Internet Sharing.
- Set "Share your connection from" to your USB Ethernet adapter (e.g., "USB 10/100/1000 LAN" or "AX88179A").
- Set "To device using" to Wi-Fi.
- Click Wi-Fi Options to set your network name and password.
- Enable Internet Sharing.
- Launch SideDisplay and connect your Tesla to the Mac's Wi-Fi network as usual.
Pros:
- No iPhone needed at all
- Most stable and fastest internet connection
- No cellular data usage
Cons:
- Requires physical access to an Ethernet network
- Carries an extra adapter and cable
Method 2: Travel Router
Best for: Anywhere without a wired network — coffee shops, hotels, airports, Starlink setups, or if you have an Android phone instead of an iPhone.
As explained above, macOS cannot use Android USB tethering or USB Wi-Fi adapters. A travel router is the solution: it connects to any wireless internet source and presents it to your Mac as a wired Ethernet connection — the one type of connection macOS fully supports.
What you need:
- A travel router with Client/Bridge mode (e.g., TP-Link TL-WR902AC, GL.iNet GL-MT300N)
- A USB-C to Ethernet adapter
- A short Ethernet cable (usually included with the router)
How it works:
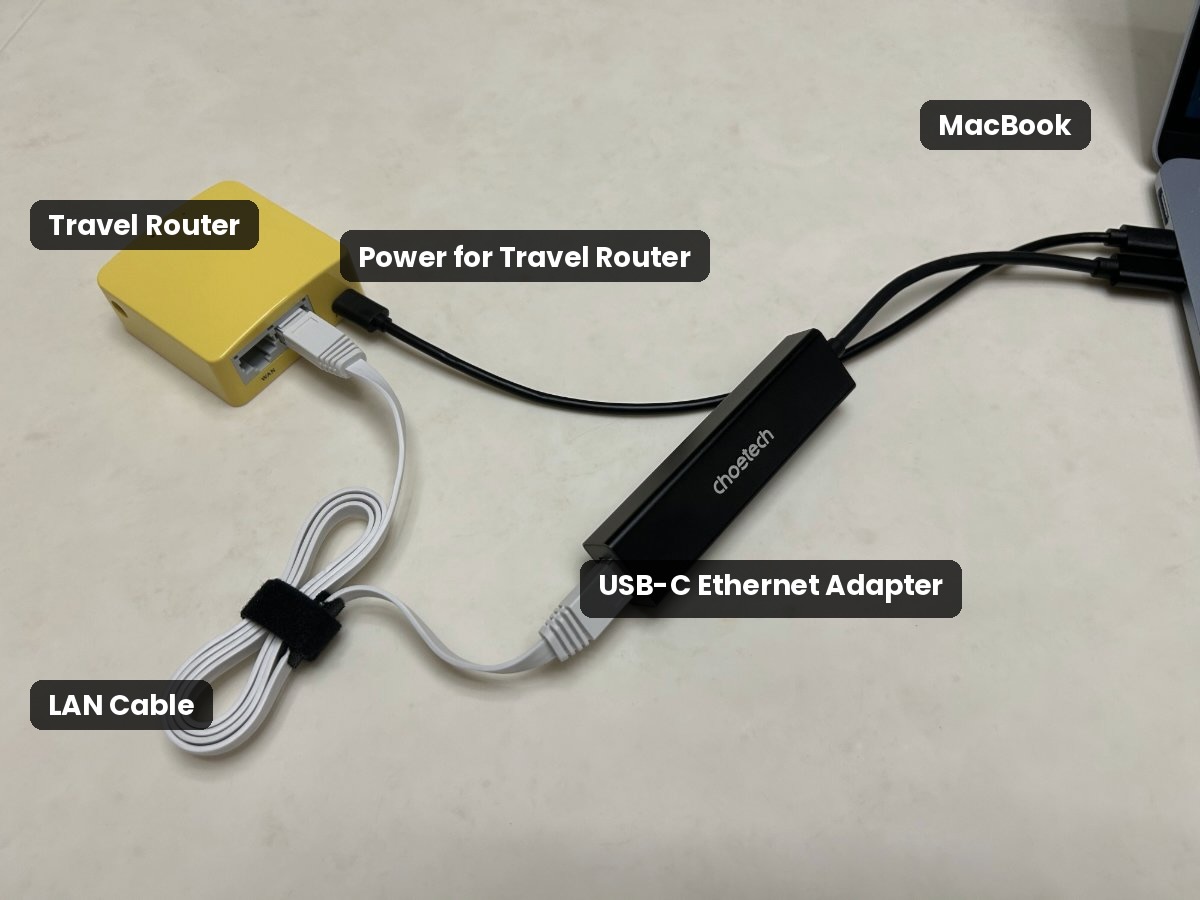
The travel router connects to an internet source wirelessly (Android hotspot, café Wi-Fi, Starlink, another Wi-Fi router, etc.), then passes internet to your Mac over Ethernet. Your Mac sees it as a standard wired connection, so the built-in Wi-Fi stays completely free for Internet Sharing.
Setup:
- Configure your travel router in Client/Bridge mode (one-time setup via the router's web interface).
- Connect the travel router to the available Wi-Fi network (or your Android phone's Wi-Fi hotspot).
- Connect the USB-C Ethernet adapter to your MacBook.
- Plug the Ethernet cable from the travel router into the adapter.
- Verify your Mac is online via Ethernet (check System Settings → Network).
- Open System Settings → General → Sharing → Internet Sharing.
- Set "Share your connection from" to your USB Ethernet adapter (e.g., "USB 10/100/1000 LAN" or "AX88179A").
- Set "To device using" to Wi-Fi.
- Click Wi-Fi Options to set your network name and password.
- Enable Internet Sharing.
- Launch SideDisplay and connect your Tesla to the Mac's Wi-Fi network as usual.
Pros:
- Works anywhere there's Wi-Fi — no iPhone needed
- Only option for Android users to use SideDisplay
- Travel routers are small and portable (pocket-sized)
- One-time configuration per Wi-Fi network
Cons:
- Requires purchasing a travel router ($25–$40) and Ethernet adapter
- Slightly more setup than iPhone tethering
- Travel router needs its own power source (usually USB-powered)
Quick Comparison
| Method | Cost | Portability | Internet Source | iPhone Required? |
|---|---|---|---|---|
| iPhone USB Tethering (standard) | $0 | ★★★★★ | Cellular | Yes |
| USB Ethernet Adapter | $10–$20 | ★★★ | Wired network | No |
| Travel Router | $35–$60 | ★★★★ | Any Wi-Fi / Starlink / Android Hotspot | No |
Bonus: SideDisplay Works Beyond Tesla
SideDisplay isn't just for Tesla owners. It works with any device that has a WebRTC-compatible browser — including iPads, Android tablets, old laptops, and other vehicles with built-in browsers.
The setup is the same: connect the device to your Mac's Internet Sharing Wi-Fi network, open the browser, and navigate to the connection URL. If the device has a modern browser, it works.
Summary
The core principle is simple: SideDisplay needs your Mac's Wi-Fi to be free for Internet Sharing. Any method that provides internet to your Mac through a wired or USB connection — whether it's an Ethernet cable, a travel router, or a phone's USB tethering — will work.
Pick the method that fits your setup, and enjoy your extended display.