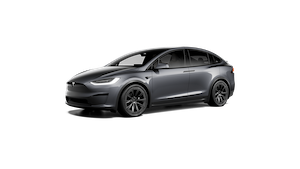
In 2023, I bought a Tesla Model X. As a software engineer, the first thing that caught my eye wasn't the acceleration or the autopilot — it was the massive display sitting right there on the dashboard.
I often work from home, and one of my favorite things to do is drive my Tesla to a quiet spot and work from there. There's something about sitting in the car, parked somewhere peaceful, with a laptop open and a coffee in hand. I started calling it Work From Tesla.
But every time I looked at that beautiful 17-inch display just sitting idle while I worked on my 14-inch MacBook, I thought: why can't I use that as a second monitor?
That question sent me down a rabbit hole that lasted months.
Attempt #1: Hardware Modification
The most obvious idea was to physically install an HDMI input port into the Tesla. I figured it might be possible with enough effort and the right hardware.
But I didn't want to tear apart my brand new car. Beyond the risk of damaging something, any hardware modification could void the vehicle's warranty. As a software engineer, I'd rather solve problems with code, not a soldering iron.
So I started looking for a software-based approach.
Attempt #2: Zoom
Here's a fun one. Tesla actually has a built-in Zoom app. So in theory, I could start a Zoom meeting on my MacBook, share my screen, and view it on the Tesla's display.
It technically worked. But it was terrible. The video had to travel through Zoom's servers and back, introducing noticeable latency. And worse, Tesla's built-in Zoom app doesn't support fullscreen mode. So I had a laggy, windowed view of my desktop. Not exactly the second monitor experience I was after.
Attempt #3: Direct Connection via Private Network
I realized what I really needed was a direct connection between my MacBook and the Tesla — no cloud servers in between. The Tesla has a web browser, so if I could get it to connect to a web server running on my MacBook, I could stream my screen directly.
To make this work, both devices needed to be on the same local network. I bought an LTE router, connected both the MacBook and the Tesla to it, and figured it would just work.
It didn't.
The Private IP Discovery
After hours of debugging, I discovered something that isn't documented anywhere: Tesla's web browser blocks access to RFC 1918 private IP address ranges (10.x.x.x, 172.16.x.x, 192.168.x.x).
My best guess — and it's only a guess — is that Tesla's internal vehicle systems — cameras, sensors, controllers — use these private IP ranges internally, and Tesla blocks the browser from accessing them as a security measure to prevent potential attacks on the car's internal network. This isn't documented anywhere, and I have no way to confirm it.
But this gave me an idea: what if the MacBook and Tesla were assigned public IP addresses instead?
The OpenWrt Workaround
I picked up a GL.iNet GL-MT300N-V2, a tiny travel router that runs OpenWrt. Its web interface only allows configuring private IP ranges, but SSH access gives you full control. I configured it to assign public IP addresses to connected devices and set up the network like this:
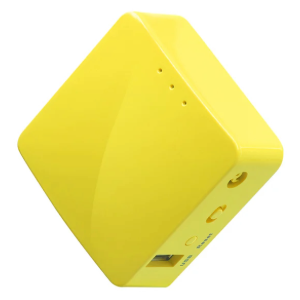
LTE Router → OpenWrt Wi-Fi Router → Tesla & MacBook
I opened the Tesla browser, typed in the MacBook's (public) IP address, and... it worked. The Tesla browser loaded the web page served from my MacBook. For the first time, I had a direct connection between the two.
Now I just needed to stream my screen through it.
Attempt #4: OBS Studio + HLS
My first streaming attempt was with OBS Studio. The problem was that OBS primarily uses RTSP/RTMP protocols, which Tesla's browser didn't support. From what I could find online, these are older protocols and there are mentions of security concerns, which may be why browsers have moved away from them — though I'll admit my knowledge of these protocols is limited, so I can't say that with certainty.
After more digging, I found that OBS could output HLS (HTTP Live Streaming) segments. I built a Node.js web server that served these .ts segments as a live stream, with a JavaScript-based HLS player on the frontend.
It worked — I could see my MacBook screen on the Tesla display. But there was a fundamental problem: ~2 seconds of latency. HLS works by writing video segments to disk and then serving them, so there's an inherent delay. Though it's possible that someone with deeper knowledge of HLS could have reduced this further — I may have simply hit the limits of my own expertise here. Either way, you can't move your mouse and expect the cursor to respond two seconds later. Not usable as a second monitor.
But the proof of concept was there. Screen streaming to Tesla via its browser was possible.
Attempt #5: WebRTC
Then it hit me. In my day job, I had briefly worked on a service that used WebRTC. The key advantage of WebRTC is that it's natively supported by browsers — no plugins, no extensions, no special players. And it's designed for real-time, low-latency communication.
I set up a Chrome extension to capture my screen and create a WebRTC session. I opened the sharing URL in Tesla's browser and... nothing. It didn't work.
I tested the browser's WebRTC capabilities using an online checker and it appeared that Tesla's browser didn't support WebRTC at the time. Dead end. I shelved the project.
The Comeback
A few months and several Tesla software updates later, curiosity got the better of me. I tried the same WebRTC setup again.
This time, it worked perfectly.
Did Tesla quietly update their browser's WebRTC support? Or did I simply make a mistake the first time around? I honestly still don't know. But WebRTC was now functional on the Tesla browser, and the latency was dramatically better than HLS.
The Display Extension Problem
There was still a critical issue: WebRTC screen sharing only does screen mirroring, not display extension. I didn't want to see a copy of my MacBook screen on the Tesla — I wanted an additional screen, a true extended desktop.
The solution came from an unlikely place: dummy HDMI adapters. These are small plugs that server administrators use to trick a headless machine into thinking a monitor is connected, enabling remote desktop access.
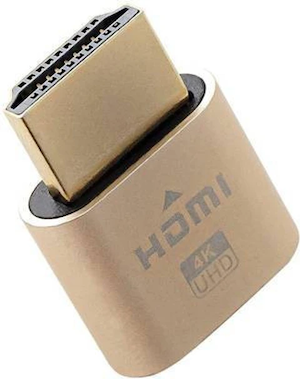
I bought one, plugged it into my MacBook, and macOS immediately recognized a "second display." I then shared this virtual display via WebRTC to the Tesla. My MacBook now had two screens: its own, and the Tesla's.
It worked. But the setup was getting ridiculous.
The Bandwidth Wall
At higher resolutions, the stream quality depended heavily on Wi-Fi throughput. My OpenWrt router maxed out at 300Mbps, which wasn't enough for a smooth, high-resolution extended display. Routers with 1Gbps+ support started at $100+, and I was already carrying around an LTE router, a Wi-Fi router, and a dummy HDMI adapter.
I stepped back and asked myself: can I do this without any of this hardware?
The Breakthrough: Software Only
More than a year passed. Then the idea resurfaced, and this time I approached it differently. Every piece of hardware I was using had a software equivalent:
Replacing the LTE Router + OpenWrt Router
iPhones have Personal Hotspot. MacBooks have Internet Sharing. If I connected my iPhone to the MacBook via USB tethering (to keep the MacBook's Wi-Fi free), I could then enable Internet Sharing on the Mac, which broadcasts a Wi-Fi network that the Tesla can join.
This meant the MacBook itself became the router, and the Tesla connected directly to it over Wi-Fi. No LTE router. No OpenWrt router.
But I still had the private IP blocking problem. When macOS creates an Internet Sharing network, it generates a bridge100 network interface and assigns private IP addresses via bootpd.
The fix turned out to be straightforward:
- Change the IP address range on the
bridge100interface to a public IP range - Update the
bootpdconfiguration to assign addresses from this public range - Adjust the NAT rules accordingly
Three configuration changes, and the Tesla browser could once again reach the MacBook's web server — no extra routers needed.
Replacing the Dummy HDMI
Apple provides a framework called CGVirtualDisplay that allows creating virtual displays in software. No physical adapter needed — macOS thinks a real monitor is connected, and you get a fully functional extended desktop.
The Final Architecture
With all the pieces in place, the setup was now:
| Original Hardware | Software Replacement |
|---|---|
| LTE Router | iPhone USB Tethering |
| OpenWrt Wi-Fi Router | macOS Internet Sharing (bridge100 + bootpd + NAT) |
| Dummy HDMI Adapter | CGVirtualDisplay API |
Total additional hardware cost: $0.
Everything was handled by software running on devices Tesla owners already have: a MacBook and an iPhone.
Building SideDisplay
I knew I wasn't the only one who wanted to Work From Tesla. I'd seen the tweets, the Reddit posts, the forum threads — people tagging @Tesla and @elonmusk, asking for AirPlay support, wishing they could use their car's display as a second screen.
So I took everything I'd learned — the network configuration tricks, the WebRTC streaming, the virtual display — and packaged it into a single macOS application.
That app is SideDisplay.
One click to start. No hardware modifications. No extra routers. No dummy HDMI adapters. Just your MacBook, your iPhone, and your Tesla.
The display that was just sitting there? It's your second monitor now.